Every year, hundreds of house fires occur in Albertan homes. A reliable and functioning smoke alarm is one way to help keep your family safer.
When a smoke alarm detects the signs of a fire, a loud alarm sounds, helping get you and your loved ones out of harm’s way. But what happens if that alarm doesn’t go off? Unfortunately, 3 out of 5 home fire deaths are caused by a malfunctioning smoke alarm. And the most common cause is low or dead batteries.
In this blog, we’ll explore the importance of hardwired smoke alarms, how they differ from their counterparts, and how to install one in your home.
What Is a Hardwired Smoke Alarm?
A hardwired smoke alarm uses 2 sources of power to increase reliability. While they still use batteries as a secondary power source during an outage, these detectors are hooked up to your home’s electrical system, making them more reliable.
Why Is Hardwiring Important?
Hardwiring your smoke alarm increases the chance of your unit consistently having power. Battery-only detectors are useless if the battery is low or dead. Connecting both sources of power acts as an increased safety system.
Hardwired smoke alarms can also communicate with one another through your home’s electrical system. In this interconnected system, if one alarm goes off, a signal will be sent to the other connected smoke detectors to start beeping. Hardwired smoke detectors are more likely to alert you and your family of a fire anywhere in the building.
How to Hardwire a Smoke Detector
Now you know why you should consider a hardwired smoke alarm. But how do you go about installing one in your home?
Installing a hardwired smoke alarm can be done by most DIYers, but advanced electrical skills are required. Expect hardwiring each alarm to take between 3-6 hours.
The cost of installing a hardwired smoke alarm on your own will vary depending on the device’s brand and whether or not you have to buy any of the necessary equipment.

Step 1: Map Locations
The first step is figuring out the type of alarm you wish to install and mapping out the locations throughout your home.
Hardwired smoke alarms come in two types: ionization and photoelectric. Different kinds of technology will function better or worse depending on where they’re installed.
Photoelectric alarms are better suited for areas like the kitchen because they use a light sensor rather than smoke particles to detect a fire, minimizing the risk of a nuisance alarm. Ionization smoke alarms tend to work well for garages.
Keep in mind that for some interconnected systems, the alarms may have to be the same type. This should be clearly outlined on the manufacturer’s packaging.
Once you know where your alarms are being installed, move on to the next step.

Step 2: Note Expiry Dates
Make a note of the expiry date of your new alarm. You can do this by checking the outside rim of the unit.
If your smoke alarm lacks an outer rim expiry date, it will be located at the bottom of the unit. Simply remove the cover from the mount, and within will be a sticker indicating the date of manufacture. Your expiry date is likely to be 10 years from the date of manufacture.

Step 3: Turn Off Power to the Circuit
Safety first! Turn off the power to the circuit you will connect the smoke alarm to. This can be done with your main electrical panel. Test all wires and devices with a non-contact voltage detector before starting any work.

Step 4: Cut Box Holes
Use a stud finder to make sure you are clear of any studs, and then cut the holes for the units to sit within using a ceiling hole saw.

Step 5: Run Starter Cable
Run a 14 gauge two-wire cable to the first smoke alarm location. The power source for this first location will be your home’s electrical panel, a wall outlet, or a switch.
But make sure power to your smoke alarms cannot be turned off with a switch. It’s essential your alarms stay connected at all times for maximum safety.

Step 6: Draw Cable Through the Box
Before attaching the electrical box to the ceiling, draw the initial electrical cable through the back of the box. There should be several inches of line available.
Step 7: Run Cable to More Alarm Boxes
With the first box still unattached, run the 14 gauge, three-wire cable from the first box location to the second. And from the second to the third, and so on. The 3rd wire is for the alarms to communicate with one another.
Step 8: Run Cable Back to the First Box
Run the 14 gauge three-wire cable back to the first electrical box and push the first box back into the ceiling. Use a drill to screw the box tight against the ceiling.
Step 9: Install Mounting Plate
Attach the smoke alarm’s mounting trim ring to the face of the electrical box. Your smoke alarm device will attach to this piece.

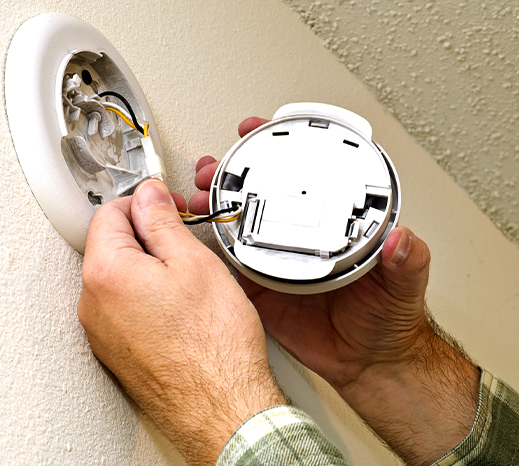
Step 10: Wire the Smoke Detector
On the back of the smoke detector, attach both sets of wires. Some devices may have built-in quick connectors to allow you to strip the wires and connect them directly to the unit. If not, you can secure the wire nuts.

Step 11: Insert Batteries & Mount
Insert batteries into the detector. Remember, this will be your secondary source of power should an outage occur. Attach the detector to the mounting trim ring.
Follow these steps for each device being installed.

Step 12: Test for Power
Test your alarms by pressing the middle button on the face of the detector.
Professional Electrical Fire Safety
Not comfortable wiring a smoke alarm on your own? Not to worry, our skilled electricians are trained in all aspects of electrical fire prevention and will be happy to install new hardwired smoke alarms for you.
Like any electrical device, hardwired smoke detectors must be installed with caution. Professional help from Westridge Electric is always just a call away.
Keep you and your loved ones safe by testing your smoke alarms monthly, replacing your unit every 10 years, and scheduling regular home electrical inspections.
